Rainbow Dash Wings and Cascading Ruffle Tail Tutorial
Okay, so some of you know that about a month ago, I did a featured guest post over at the legendary Me Sew Crazy. Such a sweet gal, that Jessica! Anywho, I am just reposting here today, for those of you who might have missed it. I mean, Halloween is coming up after all... ;-)


I recently made my daughter a Rainbow Dash birthday dress for her upcoming birthday. As per her request, her dress had two super fun elements that I want to share with you all: a modest set of wings added to a back bodice and a cascading ruffle tail! This will be perfect for any birthday dress and a great added touch to those Halloween outfits that we'll all be toiling away on soon enough!!
Let's start with the wings!
*(this tutorial will be just for the back bodice. Finish the front bodice however you like, but keep in mind it will have to have a lining.)*
What you will need for wings:
about 1/4 of a yard of fabric
wing template and a bodice back pattern
about 1/4 of a yard of fusible interfacing (light to medium weight)
iron
sewing stuff
Files to download/print are below. Do not scale pages. And make sure you check the sizing by the 1" box.
Instructions:
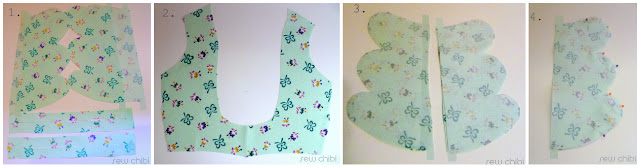
1.) Download the template. You can find it just above this picture. You can use the one I drew or you can free-hand draw your own, but it is a good idea to draw it out before you cut it. Make sure you have about 1/2" seam allowance on both ends and both edges (*the template I made has them included already).
Cut out your wing pieces.
You will need 4 wing pieces of fabric and 4 of interfacing (a mirror set each for the left and right sides of your back bodice). Cut out two rectangles as tall as your wing pieces with the seam allowances included (I used 1/2") and as wide as your seam allowance will be. (*again the template I made includes the rectangles. They are each 1" wide) Keep in mind, a tighter seam allowance will have a narrower opening (that's good).
2.) Cut out your bodice back piece(s). I highly recommend lining your bodice for this look because the wings will add some weight to your fabric. The way I find it looks (and feels) best is to stitch it in a certain manner to the lining. But more on that later. Just cut a main fabric piece and a lining fabric piece.
3.) Apply your interfacing to the wings as per the instructions. If you have any overhang at all (of interfacing) trim it away. But try to apply it as perfectly as possible. Do not slide the iron around, lift and apply to a different area.
4.) Pin two wing pieces right sides together. Matching up the tops and bottoms with their winged clone, pin, starting from just past the 1/2" seam allowance edge and around each of the scallops. I am not one for pinning every little thing I do, but it is imperative
that the scallops (wings) match up perfectly, so pinning is a must!
5.) Stitch along the scallops with a 1/4"-3/8" seam allowance. Make sure that you lift the presser foot as often as needed to get the curves just so. It helps to have a smaller stitch length (2m-2.5m) so that navigating the curves is easier. When you come to a point stitch two stitches above it and then pick up the presser foot, pivot for the start of the next curve down and continue your stitching. And by all means, stitch s. l. o. w! Stop when you reach the opposite seam allowance edge. And as always, back-stitch at the start and the the end of your stitching.
6.) Clip into the point of the curves. Clip as close as possible without snipping your thread. This will give you a crisp point when it is turned right sides out.
7.) Pink the edges. This will allow for some ease from the curves (you could alternatively notch them, but if you have pinking shears, go ahead and use em'!) When you come to the points, stop. Just trim as close as you can. (see picture 7. above)
8.) Turn right side out and press. Repeat for remaining wing. Yeay! You have two wings! Now it's time to attach those bad boys!
9.) Press the 1/2" seam allowance remaining back along the edges. You want to match right sides for both sides of your two wings. (You want to sort of make it "stand up".) Make sure you don't just press both seam allowances to one side.
10.) Cut your rectangles. Then, on each rectangle piece, you will want to draw a line 1/2" in from the top, bottom, and both sides. Double check your line with your wings to make sure they match up. Your line should start from the top of the wing (not the seam allowance edge) to the bottom. Make sure this is as accurate as possible. You don't want it to be too big because then there will be a gap, and if it's too small, it will bunch when you insert the wings. Repeat for the other rectangle. You can, if you want, finish the edges and line cuts. For the rainbow dash dress, I fray checked them. I don't normally use fray check for stuff, but if you are using very lightweight fabric I recommend using it. Don't worry about the wings being scratchy, because it will be lined!
11.) Make a matching mark on your bodice back main piece. Do not cut your lining!!! Take your rectangles and place them where you will want the wings to go. I like them to be equidistant between the shoulders and down about an inch and a half (see pic 10. and 11. above.) Match your rectangles perfectly and mark your lines on the bodice back. Make sure you have sufficient room above the rectangle for sewing your shoulder seams and at the bottom for sewing your bodice to your skirt (or for hemming if you are making a shirt). When you are happy with the placement, cut the two (one on the left side of the bodice back and one on the right) lines for your wing insertion!
12.) Stitch the long sides of the rectangles to the bodice back. Right sides together and starting from the top where your slit begins (no more, no less), stitch about 1/8"-1/4" (no more than 1/4"!) from the edge along the long edge. We will not be stitching across any short edges! Trust me, it'll work. Back-stitch at the start and the the end of your stitching.
13.) This is what your stitching ends should look like.
14.) Turn under your rectangle and press. I recommend turning the the top of the rectangle and pressing (towards the wrong side of the bodice back) then turning the bottom under then pressing. After that, you can go back and press the long sides under, along the seam you made. Make sure everything is as smooth as you can get it. Press on the right side of the bodice afterwards.
15.) This is what your opening should look like. At this point, you should finish your bodice front if you haven't done that first, and then attach your bodice back main piece to the bodice front main piece at the shoulder seams and then do the same for the lining fronts and backs.
16.) Final step: Sew the wings to the bodice. Insert your wings and fan out your seam allowances that your pressed back. They should be flushed with the right sides facing the right sides of your turned under rectangle pieces. They should also fit like a glove (not an actual glove, those would be weird on the back of a dress, right?!), with no gaps and no bunches! At this point smooth your lining under and make sure it lines up with the sides and centers of the bodice back. Topstitch the wings in place by stitching a rectangle around the wings, making sure it is stitched to the bodice and the lining, and that you pivot at each corner. I like to stitch around using a 1/4" seam allowance. Attach to skirt or hem it or whatever you like because your wings are done!!
Huzzah! Wings!! And they sorta flap like real wings!
How do you like my "homemade washi tape" lol. Ha! I just used colored sharpies on masking tape ;-) Worked like a charm and it doesn't smear!
Now let's make an awesome ruffle tail! I had the hardest time trying to figure out how to make this look work! Ultimately, even though others tried to help me, I made it work by trial and error and a fewer "tests" all on my own. Honestly, I feel like a mad scientist sometimes!
What you will need for a cascading ruffle tail:
a yard of lightweight fabric (broadcloth, organza,voile, etc.) (*depending on how many colors or strips you may need multiple yards. I got a yard of each color on sale. You will have some odd but wonderful leftovers though!)
a ruler for measuring out your circles.
matching thread
fray check (optional)
woven fusible interfacing
sewing stuff
To get an idea and some additional help, shwin & shwin has a tutorial on cascading ruffles that helped me a little!

Instructions:
1.) Let's follow this diagram for cutting out your fabric. The inner line is going to be your gathering line so keep that in mind when determining how much of a gather you want. Cut out as many circles as you like from as many fabrics as you like. Then cut one slit to open up your circle. Things to keep in mind:
how wide your cuts are are how wide they will be... So mine were about 4" wide. I would suggest staying in the 3"-5" range. Smaller and it won't lay well, and bigger, well it's fine if that's the look you are going for. I wouldn't do a lot of really big ones though. Maybe just one.
If you want less of a gather, cut another slit equidistant from your first slit. Now you have two ruffle pieces. You'll just gather your ruffle less than I did.
It will be really full so you don't have to over do it with a million ruffles.
Wrong sides of fabric (if there is one) will be visible.
2.) Now you may want to finish your ruffle pieces. You could do matching (or contrast for a cool look)serged edges. You could hem one side, but I didn't like this look because it didn't go with the slightly unfinished look I was going for. What I did was fray check all sides of the pieces (I know, Hand Cramp City). Don't worry about it being itchy because it will be on the outside of the fabric. Worked like a charm and it lays beautifully. I did go through an entire bottle for my look but I did waaay more ruffles than I ended up using!

3.) Apply interfacing (optional). If are using super lightweight material (like my organdy), I suggest interfacing it. I went with the mack daddy of fusible interfacing: woven interfacing. It looks like fabric and it irons sooo much better. I'm sorta hooked on the stuff! You won't need more that a half yard. You will want to apply it only to where you will be sewing. For the tail look, cut out a shape similar to the one above.

4.) Gather your ruffles. Make sure you use matching thread so your stitches aren't visible. I just gathered them really tight and then adjusted them by making them a little longer than my skirt (I guess about 3"). You may want them to be shorter on the outside and then come to a longer piece for the center ruffle(s). That's what I did.
5.) Sew them to the skirt. Okay, start from the top and center ruffle. No matter how tempting it may be, do not start at the bottom or sides. I used a 3/8" seam allowance. I also liked the look of making them "wavy" so it looks "natural" hahaha. So look at the picture just above the last one to see my stitching lines from underneath (f.y.i.: make sure you stitch on the ruffle side, or top, of the fabric). Make the center ruffle stitched down the longest, but make sure to stop a quarter of the way from the bottom. This will allow the tail to move around a bit. When you find a happy placement, knot your basting stitches reallly well. You may even want to do a separate stitching line to secure the ends of the the ruffles from coming undone (I did not).

This actual skirt was a twilight skirt I made for a special little girl... wink wink Kristin!
6.) Sew the rest of the ruffles down. Depending on how you did your wave for the center ruffle, stitch the next ruffle (then the next and the next, working your way out from the center) as close as possible to the last ruffle. I like to stitch the ruffles with the "raw" edges facing the center seam. This way they fall close together and you don't really see any gaps.
7.) Hang your skirt up and shake and shape your ruffles to lay vertically. Then, to "set" them, I do not recommend ironing!!! I didn't even give it a thought: I knew it would ruin the fluffiness of the ruffles. Instead, what I do is lay the skirt down with the ruffle side up and then smooth down your ruffles and skirt and put a couple of sewing books on top! After about an hour, take the books off. The ruffles will be set but won't be creased! Nice and fluffy! I would keep your dress hung up until you are ready to wear it.
That's it!! You can top it off with a bow if you like.
Super awesome cascading ruffle tail!! Geez I almost don't want to share that tutorial (hahaha), but darn it all if I didn't have the hardest time trying to make that look and I wouldn't want anyone else to have to go through all that trouble!
So voila! And enjoy!!
Thanks for hanging in there folks! I hope you enjoyed this edition of a Behind the Seams look at my Rainbow Dash dress. Some goodies on how to make some of the elements yourself are up in my SECRET FREEBIES CLUBHOUSE! If you are interested in making the wings or the skirt, sign up to the Sew Chibi Designs Newsletter to gain access PLUS be the first to know when new stuff is added!
“It’s like a secret sewing club for kawaii inclined! Make sure you sign up so you get...... deh secret password!
”


YAY! You're here! I'm so happy! I'm Kat! Mom, shawol, and pattern designer, this is the place where I share all of my sewing projects, chibi cosplay fashion, and DIY/tutorials! Everything around here is action-packed with color, silliness, and tons of kawaii stuff!